Welcome!


I have always enjoyed being crafty. I remember getting really excited about stickers and fun stationary when I was little. Well its good to know that some things in life never change!

I was introduced to scrapbooking in 2005 and have been hooked ever since. My love of crafting has branched out to include DIY, projects, gardening, baking, and canning. I hope to share my projects here.

Sunday, January 29, 2012

52 Tags Challenge for 2012: Weeks 1-4

Hi all,
Janis at Pause Dream Enjoy has a year long challenge to make a tag a week and at the end of the year you have a nice tag album. You can find all the details here. I am hoping to complete this challenge this year. I have been following the challenge so far, but have yet to post any of the tags I have made.

So here are my tags:
Week 1: What are your goals, hopes dreams, resolutions:
This is from the Daily Grind paper line. It pretty much sums up my goals for this year. All I did was accent the hearts and flowers with diamond glaze and added some glitter to the word play and the me in time on the bottom.

All my tags are from Elegant Edges. Pg 38 Oblong Shift. cut at 5 inches.

Here is the backside of the tag, listing my actual goals. I used a CTMH stamp set to make the patterned paper, and an older journal card from Creative Memories. (use what I have!)
Here is week 2:
What is the last book you read? Well mine was The Hobbit by J.R.R. Tolkien. I am a big fan of The Lord of the Rings and I haven't read The Hobbit in many years, so I thought I would re-read it again.
The main character was created using the beardless gnome from Freshly Picked. I confess, I do not really like to make "people" in my crafting. I never can get their faces right, and I don't own any peachy Keen face stamps. (gasp!) Anyway...the sword and Mountains are from Paper Doll Dress Up, and the dragon is from Pagoda. That cloud paper is printed from my Imagine Best Friends.

Here is week 3: What do you think of when you hear "Warm and Cozy"
Well I think of snuggling in front of the fireplace:
The fireplace is from Christmas Cheer. I cut it several times in different colors and hand cut the pieces to get those extra layers. The Couch I made welding a couple of shapes from George together on my Gypsy. The hair pieces are from Paper Doll Dress Up. I used Rosie Day Embossing folder for the background.
Here is the back of Warm and Cozy..I found this great little journal card with a Fireplace on it in my stash! The sticker is Creative Memories.
Week 4: What are your favorite colors:
Mine are Pink and Green. I just love those color! My background paper was made with several different border stickers in my colors. I layered them next to each other and then trimmed off the edges. The font is Gypsy Font, welded together. I added some bling too!


Well..Hopefully I will be able to keep up with this challenge. I have pre-cut my base pieces to save me some time later on.

Go check out the challenge at Pause Dream Enjoy!

Thanks for visiting today.

Have a Great and Crafty Day!
Jan

Happy Birthday Garland

Hi all,

February is our celebration month. My two youngest daughter's birthdays are both in February so we have each actual birthday to celebrate, the kid parties, and then the family party. (Throw in our Anniversary as well as Valentine's Day and we got ourselves one BUSY month! LOL)

So I saw this technique on the Cricut blog, where Jana sewed here garland pieces together on the sewing machine. I thought that looked fun so I made a garland that says happy birthday.
Sorry the picture isn't that great, its hard to get something so long into one picture.
The cupcakes were all cut from Cupcake - Lite cartridge at 2 inches. That Lite cartridge only has the base and shift layer. It also has a font and shadow font.

First I took a piece of patterned paper from my stash that had a white background. I chose one that I wouldn't use for any other project and used that as my base to sew together. That way the back side of my garland is all white. I cut all my base pieces in that paper. I punched out 1/2 inch circles to put between the cupcakes. I numbered them in order so I wouldn't get it all mixed up. I then just fed them into the sewing machine in order. It was so easy.
Then I cut all my top pieces in recollections cardstock from Michaels. I embossed almost every piece and on a few of the cupcakes I trimmed pieces down to give more definition to the cuts.

Here are close-ups of all the cupcakes so you can see the individual embossing.


It was a fairly easy project to put together. Picking the color order for the cuts and layers was what took me the longest. I made a chart to make sure I wasn't repeating the same color combinations over and over again.

This garland will stay up pretty much most of the month. I really love making our own decorations. Its much more personal. Maybe I'll make little garlands with the girls names on them to match.

Thanks for visiting today.

Have a Great and Crafty Day!

Jan

Saturday, January 28, 2012

Friendship layout

Hi all!

Today I am sharing a quick little layout I made for my BFF for Xmas. Well actually its for both of us, because we have this great tradition that we started in 2005. We have one scrapbook, and we each take turns making a layout and giving it to each other. Its a fantastic way to share pics of the two of us. Its also a great way to see how our scrapbooking has evolved over the years.
This layout has no Cricut at all! Gasp! It uses some 8x8 paper from Making Memories that I got free from Archiver's. It was a gift with purchase promo a few years ago, and I have been hoarding the paper. Every time I have pulled it out to use, I say to myself, "I can't use THAT! Its too pretty" And so the pack sat on my shelf for years. Well I am trying to break myself of that habit, and use the things I have collected over the years.

Everything on this layout was from my stash and quite a few years old at that! (Well, except for the twine, that is not that old!) I am so glad I am working in older products into my crafting.

I carefully cut around the flower so I could tuck my photo behind it. The tags were from American crafts and have definitely been in my embellishment bucket for years! The vellum quote is from Creative Memories, it too, is several years old. The date sticker in the corner is from American Crafts.

Another thing we do is reuse the same gift box and take turns using it to wrap our presents in to each other. And with each use, we add something silly to the box, like a silly or unattractive picture of something that makes us laugh.
Here are a few pics of the box:


Just a little peek into the deranged minds of me and my Bestie! XD

Anyway...Thanks for visiting today.

Have a Great and Crafty Day!

Jan

Friday, January 27, 2012

Chicken Wire Frame

Hi all! Today I am sharing the frame I made for my Friend that goes with the banner from yesterdays post.

I got the idea for the chicken wire frame from Emma at My Creative Time. I picked up this frame from Joann's. I painted it Wicker White. I then stapled Chicken wire to the back side and covered the edges with felt and hot glue. You can visit My Creative Time and see a video tutorial here.

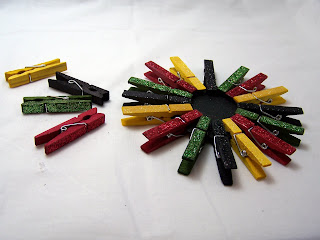
I also dyed some mini clothes pins to use to hold things on the frame. I got the idea from jumping around pinterest and ending up on the Rit Dye website. For instructions and ideas go here.
After I dyed them I added glitter to one side to make them extra sparkly.

Here it is all decked out with some things I added for my friend.
My Bff is a HUGE Twilight fan, so I picked up this ornament for her tree.
I also added a tag I made from a Make and Take from a scrapbook expo using Tim Holtz products. I thought she could use it as a bookmark, as she is an avid reader.
So there is the frame that goes with the banner. I have plans on making myself one of these frames a little later in the year. I think it will be a great way to showcase the artwork my daughters make.

Thanks for visiting today.

Have a Great and Crafty Day!

Jan

Thursday, January 26, 2012

Enjoy Banner

Hi! Today I am sharing a banner I made for my friend for Xmas. I haven't posted this sooner because we just celebrated yesterday.

The Banner cuts and layer were from Birthday Bash. The rest of the cuts were from Art Philosophy.
Here are the close-ups of each pennant in the banner:


The paper used was a 8.5 x 11 pack from the Paper Studio called Magic of the Season. I added a few gems to each letter, some glitter to the flowers and tulle from my stash in red, cream, and black. I added some pearl beads in between each pennant.

I made this banner to hang on a chicken wire frame. I will show the frame in a another post tomorrow.

Thanks for visiting today.

Have a Great and Crafty Day!

Jan


Wednesday, January 25, 2012

Feel Better Soon Gift box

Hi all,

Here is my entry into this weeks Cricut Circle Blog Challenge.
The challenge is is to create a Get well card or gift set for a friend.

It must contain two Cricut cuts, Cuttlebug embossing, Kraft stock and string in the project.

I made this cute Doctor's bag using the toolbox cut on Sweet Tooth Boxes in black cardstock. I cut the handle and clasp in a shiny silver paper from a scrap I had. I added some heat set studs to the clasp, handle, and edges of the top of the bag. I love these! They give the same look as a brad, but without the legs of the brad showing on the reverse side. I made the cross by welding two rectangles from the George and Basic shapes cartridge. I then embossed the cross with the Swiss Dots Cuttlebug folder.

Here is a closeup of the tag. I used the clipboard cut from Fabulous Finds Cartridge. I cut it twice, one in the silver and once again in Kraft paper. I layered the craft onto the silver to help give some pop to the silver clip portion of the cut. I added a stamped sentiment to a layered piece of cardstock, and affixed some studs to the tag. I attached it to the bag with twine. I also added a magnetic closure under the silver tag to keep the bag closed and added a big red bow tot the front.


Here is what I filled my box with: A home made cup of Chicken noodle soup mix. I printed the directions on my computer, stamped a circle around them and punched it out with a 1.5" circle punch. I attached it to a 2" scalloped circle cut. I also added some cherry couch drops, tissues, and a couple packets of tea.


I am really pleased with how cute this little box came out. I can't wait to try more boxes from this cartridge.

Thanks for visiting today.

Have a Great and Crafty Day!

Jan

Saturday, January 21, 2012

50th Wedding Anniversary card

Hi all,

Today I am sharing a card I made for my In-Law's 50th Wedding Anniversary.
I used Cuttlebug 5x7 Embossing Plus in Brocade Window on Coordinations Glittery paper. I can't remember the name of this color. Its a golden beige. Its pretty sparkly. I cut the 50 using storybook, and the "th" from Gypsy Font. I welded them together.


Here is a close up of the front flower. I used Flower Shoppe for the flower and leaves. The flower is Fun4 Cut at various sizes. I also cut some layers of Fun 3 at various sizes for the center of the flower. I made a Tulle round flower by twisting the tulle and sticking it on glue paper. The button in the center is from my Grandmother's stash of old buttons. The crochet doily under the flower was from my stash. I also included a stick pin from a set from K & Company. The silky ribbon was also from my stash.


Here is the sentiment I printed on a sheet of patterned paper I had.

This was a difficult card for me to make. Its a little bit more fancy than I am used to making, and I really do like how it came out, however, I spend a good portion of the day making it, so I probably won't make many this fancy. LOL

Thanks for visiting today!

Have a Great and Crafty Day!

Jan

Saturday, January 14, 2012

Happy Birthday using Just a Note

Hi all!

Today I am sharing a card I made for my Cousin's daughter. It is the first time using the Just a Note cartridge that came built into my Expression 2 Anniversary Edition.

I have to say, after struggling to make this card.. the Just a Note cartridge is not one of my favorites. At least not the tri-fold card and its layers. Since I can not cut with the cartridge using my Gypsy, I felt more limited.

Here is the entire card:
I used a piece of Whitewash collection paper for the base. The patterned paper was from an older 8x8 stack by the Paper Studio called So-So Sweet. I added bling and twine to the front. I am not loving the font used with this cart.

Here is the second layer:
I cut the base of the cake twice, once in patterned paper and once in white Bazzil Bling. I trimmed off the stand from the blue layer so my plate and cake were different. I added some glitter, bling, and twine to this layer.

Here is the inside opened up:As you can see, I embossed each section with a different embossing folder. Although the cupcake one on the front layer was too busy for the Happy Birthday to sit on, so I covered the front layer up with the same blue patterned paper as I used on the cake.

I added a rectangle with two corners punched for the sentiment. I tied some more twine around that too.

Well at least I can say that I have finally used this cartridge, although I don't think it will get very much use in the future, that is, until Provo Craft figures out how to add it to my Gypsy Library.

Thanks for visiting today

Have a Great and Crafty Day!

Jan

Friday, January 13, 2012

Princessaurus Shirt

Hi all!
Today I am sharing a t-shirt I made for my cousin's daughter. She loves dinosaurs and its not too easy to find girly dinosaur shirts.

I cut this cute dino from Create a Critter at about 5 inches. I used two different colored pink heat transfer vinyl and layered the pieces. I did use my Gypsy to hide a few contours on two of the layers.

The font is from Nursery Rhymes, its 1.25 inches. I really like it and use it a lot for my girly font. I used Glitter heat transfer vinyl for the hat as well as the font. Normally I would lay out the letters exactly how I want them to be on the shirt and then cut it that way, however, I didn't want there to be too much waste with the glitter vinyl, so I cut them separately and ironed them on one at a time.

The hat was cut from Once Upon a Princess. I sized it up on my Gypsy to fit the dino's head.

After I ironed on all my vinyl, I took a few thin strips of glittery tulle and sewed them to the tip of the hat. I added a few heat set gems to the hat as well.

I am quite pleased with how well it turned out. It is the first time I ever made a shirt with this type of vinyl layering. I am eager to try more vinyl designs on clothing.

Thanks for visiting today!

Have a Great and Crafty Day!

Jan


Thursday, January 12, 2012

Plastic Bag Holder

Hi all!

I am sharing today, My entry into the Cricut Circle blog weekly contest. We were to show how we use our Cricuts to organize our house. The project needed two Image cuts.

I made a fabric sleeve to hold the plastic shopping bags. I have many canvas bags for shopping so I am surprised at how many of these plastic guys make it into our house.

Everything used in this project was either recycled or scraps leftover from other projects. I feel good about repurposing things instead of tossing them out.

Here is my sleeve:
The canvas was leftover after shortening some curtains for my Mother in Law. The letters were cut on scraps of fabric using the Pooh Marker Font. I used Heat and Bond to iron the letters onto the sleeve. The recycle arrows were cut from Give a Hoot.


Its hard to see, but the arrows are dark green and the letters are black with tiny white polka dots on them. I used a small piece of elastic on the bottom of the sleeve, and the wide ribbon at the top used for the handle came off of packaging for a blanket.

I am slowly working on getting my home more organized. I will definitely be using my Cricut in future organizational projects.

Thanks for visiting today!

Have a Great and Crafty Day!

Jan

Saturday, January 7, 2012

Quick and Easy Placemats

Hi all!

I just wanted to share some quick placemats I made for my girls today.

Here is the un-laminated placemat:
I just printed a background paper using my Imagine and the Mr. Frosty cartridge. This is printed on regular cardstock.


Then I added a banner from Elegant Edges and a font from Wall Decor and More. Both were print and Cut using the Imagine and the flood fill colors from Mr. Frosty as well. I used printable vinyl as I was planning on Laminating the project and lamination works best on thinner materials.Here is my Your Story Machine. I bought this last Christmas time to make a books for gifts, and I have used it much more than I realized I would. I definitely would recommend adding this item to your crafting arsenal.
Here it is all laminated. It was hard to get a good pic without a glare on the lamination, even with my snazzy new light box. LOL
Anyway...I am planning on making the girls placemats for all the holidays/seasons this year.

Thanks for stopping by.

Have a Great and Crafty Day!

Jan

Thursday, January 5, 2012

Cookie Jar

Hi all!

One thing I love about having all my tools and supplies, is how easy it is to whip out a quick project.

I bought this jar at TJ Maxx the other day, because we needed a cookie jar that was clear. We tend to forget we have cookies in the house when we can't see them. They get lost in the pantry and when we had an opaque cookie jar we forgot stuff was in there. Stale cookies are such a buzz kill! LOL

I knew immediately that I wanted to use some vinyl on it. I used the From my Kitchen Cartridge. It had the Cookies phrase on it, and the cookies are also from that cartridge. I used my Gypsy to hide the gingerbread man cookie and only cut the chip cookie.

The black vinyl is permanent vinyl. I have used it to label mugs and such and washed those items in the dishwasher and the vinyl has stayed on. I am not sure of the longevity of the light brown vinyl used for the top layer of the cookies. That is Quickutz vinyl purchased from Hobby Lobby.

I love using vinyl for home decor as well as more intricate cuts for paper products. If you haven't cut any vinyl yet, I highly recommend giving it a try.

Have a Crafty day!

Jan

Tuesday, January 3, 2012

My 2012 Goals Journal and light tent

Hi all! I hope everyone had a fantastic New Year Celebration.

I had a grand day crafting. It was so good to be spending some time doing what I love after the hustle and bustle of the holiday season.

I already posted my goals for 2012, and I decided to make this journal to record my progress as well as a place to make notes on projects throughout the year.

It is my entry into the Cricut Circle Weekly Challenge. The challenge is a project to reflect/record your resolutions. It needs to have two cricut cuts.


I started with a grid paper journal I picked up at the start of the school year for one dollar. The patterned paper is called the Daily Grind from Fancy Pants.

I cut the words explore, create and simplify from Home Decor in vinyl. The 2012 is stamped.

I added a few flower gems from my stash, and tied a bow and some charms to a binder clip.
The flowers were cut from Mother's Day Bouquet. I embossed them with some Cuttlebug folders, Script texture and Swiss Dots.

I made a pocket on the inside cover with a scrap of the paper from the front cover. I stamped the word "contents" on the first two pages, front and back and added a journal card with my 2012 goals written out.
I printed out these calendar pages I downloaded from Paper Crafts Connection Blog. You can get them here.

I stamped page numbers in all the corners using some older clear stamps I had. I love the font. I wish I could remember who made them.
I made the back pocket simply by folding the paper around the cover and adhering it to the inside only on the edges. Here is where I am storing the calendars until I put them in the book.

I am really looking forward to having a busy, crafty year, and I hope to reach all of my goals.


On a side note:
The lighting in our house is dreadful, and I was so tired of my pictures coming out so poorly, that I constructed a light tent from a design I saw on the internet.

It is simple and cheap! I used two sheets of 20x30 white foam core board. The first sheet I scored and bent in half. The other sheet I cut in half, then made cut out squares in the sides. I then taped them to the bent piece to form a box. The top half was constructed with some left over strips.

I covered the top three sides with some cheap cotton Muslin I picked up at Joanns for 2 dollars/yd.
Inside I taped a drape to the top edge. Here is a pic of the inside. I just use work lights that my hubby had on the outside.

Its not a professional piece, but it gets the job done good enough and it cost me about 6 bucks to make, unlike the $100 price tag that many light tents carry.

Well that's all for today.

I am encouraging everyone to go and make something today!

Have a Great and Crafty Day!

Jan