Welcome!


I have always enjoyed being crafty. I remember getting really excited about stickers and fun stationary when I was little. Well its good to know that some things in life never change!

I was introduced to scrapbooking in 2005 and have been hooked ever since. My love of crafting has branched out to include DIY, projects, gardening, baking, and canning. I hope to share my projects here.

Sunday, June 26, 2011

Beauty Layout

Hello All! Here I am, two days in a row with posts! Wow I am on a roll. Actually, I am trying to complete my cartridge challenge this month, and I have two cartridges, left to use and only a week to do it. So....Here I am sharing a layout I made using Disney Happily Ever After as well as Pagoda. When perusing the Happily Ever After handbook after I drew it for my challenge, I quickly decided NOT to try to cut any of the Princesses right now, as all my attempts in the past have been less that stellar. So, I chose to use a couple of Accessory cuts from the Mulan Section to showcase my Daughter's costume pictures from the anime convention.
The patterned paper used is from DCWV Far East Stack. I used Elegant Edges to cut the decorative edge to the blue paper. I then layered a 4 inch wide strip of the tan butterfly paper in the stack and then layer 1 inch strip of the rectangular patterned paper over the edge. All papers were inked using Tim Holtz Distress Inks.

This cut is called MulFrm2. It is on page 76 in the handbook. I cut the base layer for the frame twice in brown. I then cut the flowers in a pale pinky-peach cardstock that was from my stash. I also cut the top layer from the green circular pattern from the stack. I took a small piece from the butterfly pattern and printed ACEN 2011 on it using Chinese Takeaway font.

Here is the tree from that same page in the handbook. I used the same pinky peach and brown cardstock as the frame.

I decided my layout needed a little more, so I cut a this bridge and shrine from the Pagoda cartridge. I pop-dotted the top layer of the shrine.

My last cut for this layout was also from the Pagoda Cartridge. It is the Kanji word "Beauty" from page 25 in the handbook.

Well glad that is over with...I really do not like those Princess carts too much, I am really hoping that as the Cricut Craft Room Program evolves, that cutting those Princesses will get easier.

Anyway...Thanks for visiting today.

Have a Great and Crafty Day!

Jan

Saturday, June 25, 2011

White Monotone Card

Hello All, I wanted to share with you today, a tone on tone card I made. The finished card size is about 5x5". I used Cordinations papers: Gemstone in Pearl, Canvas Texture in Bright White, and this new Glitter one named Opulent Opal.


I used the Lovely Floral Cartridge. The Card base, and three flowers use the glittered paper. The lace base cut uses the Canvas textured paper, and the border and 4 flowers use the Gemstones paper.


I pop-dotted the lace layer and the flowers layers. I used tiny gems for the centers of the flowers.


I finished the inside of the card with a three more glittered flowers layered on a small strip of the Gemstone paper.

It's a fairly simple card, but I really love how sparkly it is. I just don't think my picture does this card justice.

I am working on another card using this cartridge, as I am really enjoying it. The cuts on this cartridge have intricate cuts with a cute and whimsical feel to them. I encourage you to take a closer look at this Lite Cartridge.

Have a Great and Crafty Day!

Jan

Sunday, June 19, 2011

Father's Day Card- Cricut Blog Challenge

Hi all! Happy Father's Day! I hope all the Dad's out there are enjoying their special day.

Today I am sharing the Father's Day Card I made for my Hubby. I am also submitting it to the Cricut Circle Blog Challenge. It is a sketch challenge and we have to use at least 2 cricut cuts.

Here is the Sketch:


And Here is my card:
I used Paper from the Cosmo Cricket's Happy Camper line. I used the Hiker form Car Decals and cut him at about 3". I had cut papers to layer behind him. I inked my edges and used my Tim Holtz Tiny Attacher on my sentiment.

Here is a picture of the inside: I have really been wanting to make something from the new Circle Cartridge: Pop-Up Neighborhood. I loved the little camper pop-up.
I sized the camper pop-up at 3.62, which was the longest I could fit on a 12x12 sheet of paper. I then cut all the camper layers at that size.
I then cut a 12x6 sheet of cardstock for the card base. I also sized the background layers, which are listed as accessory in the pop-up manual, to fit on the 6x6 card. I used two different background layers to make my scene.

Here is a close-up of the pop-up layer. Originally this pop-up is to be a two-sided caper that pops up in the middle of the card. I didn't really care for that type, as I wanted to use the backgrounds too, so I trimmed off the "pop-up" layer and just used the more traditional tabs to make the pop-up. Also on the backgrounds, I used some small pop dots under some of the layer features to give the background more dimension.


I am pretty happy with how this card came out, even if I didn't make the pop-up in the way that it was designed. I will have to experiment more with this cartridge in the future.

Thanks for visiting today.

Have a Great and Crafty Day!

Jan

Saturday, June 18, 2011

Camper Decorations and Backyard campouts- Pic heavy

Hi All! School's out and we are thoroughly enjoying our summer Vacation already! We are avid campers here, but alas, with the rising gas prices, we will not be dragging our camper too far from home many times this year.

But, we are not discouraged at all..We have decided to have quite a few "backyard campouts". We have a fire pit in the backyard and the trailer is parked on a pad right next to the house, so we will be enjoying our camper in our own yard. Here are a couple of pics from our first backyard campout. My SIL and DD's enjoying the fire pit.

DH and DD's being silly by the fire. There is our camper in the background.

I thought I would share the inside of my camper with you today. I have made many decorations using my cricut and a few different cartridges.


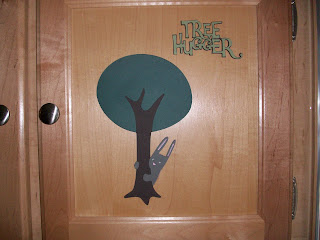
Here are some of the cabinet doors decorated with various camping/outdoor themed icons. The tree is from Give a Hoot:


Give a Hoot: Tree Hugger icon and words Give a Hoot:
Give a Hoot: DD's closet
Campin' Critters:
Cabinets over our bed: Give a Hoot Cartridge
Here is my DH's side of the bed. I used a couple of cuts from Wildlife Lite Cartridge. I HAD to put a turkey up there! LOL
Here is a closer view of the Stag Head from Wildlife Lite. I did ink this one to give it some more definition.
Here is my closet.
And of course, I had to have a Mermaid on my side too! She is from Life's a Beach.
Campin' Critters Skunk for the Bathroom door! LOL!
Here is a menu card holder I made for the door of the fridge. I used Campout to and Pooh Font to make it. The silverware is chipboard stickers from Cosmo Cricket,
I love this little phrase from Give a Hoot:
Give a Hoot animals over our sofa:
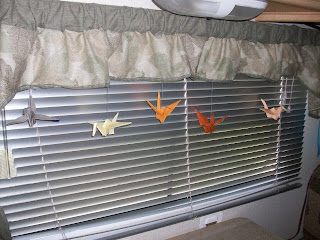
And Finally...some rainy day campout crafts: Origami Cranes we made on a campout. We strung them up on the curtains.
I have a few more decs planned. I was thinking of getting some outdoor vinyl and making a few things for the outside of the camper too!


Hope you enjoyed the little visit inside our camper.


Have a Great and Crafty Day!


Jan


License Plate Game book

Hi All! Today I am sharing with you my entry into the Cricut Circle Blog's Monthly challenge which is something made for your car for road tripping.

Well my family road trips quite a bit. We are campers and have hauled our trailer to many different states. We have always played the license plate game, so I decided to make a book to use for our game rather than just printing out a new sheet every time we go on a road trip.
For the cover, I took some chipboard and cut it down to size, then adhered the patterned paper to both sides of the front cover. The back cover I left plain.

I used Summer Vacation for the road signs and the Road Trip phrase. I used my Gypsy and Plantin' Schoolbook to weld together the shadow layer of the title. I then cut the regular layer and layered it on top of the welded shadow layer. The paper on the cover was a little too busy for the title alone so I needed to layer the title onto a piece of solid cardstock. I used Ink and gel pens to give my cuts some added depth. The route 66 was added using alpha stickers from my stash.

The patterned paper came from a stack I picked up at Michael's. It's called U.S. travel paper pad by Paper House Productions. It has a nice variety of paper printed with images from around the US.


Here is a picture of the inside pages:
I just made a list in Microsoft Word of all the US and Canadian plates as well as some blank lines for notes and add-ins. (Once we saw a Guam plate!) I printed the list back to back and the used my Bind-it-All to complete the book.

Thanks for visiting today.

have a Great and Crafty Day!

Jan

Friday, June 17, 2011

Teacher's Gifts- Greenbean's Hand Scrub

Hello all! I hope everyone has been having a good summer vacation so far. I am glad the school year is over, it seemed like it was such a long year. The start of Summer vacation was quite a hectic time, because of Alex's birthday party.

I realized that in focusing so much on Alex's birthday party, I completely forgot to make Teacher Appreciation gifts!..EEKS! So in addition to prepping for her party I had to quick whip out some teacher gifts.

Well its Greenbean's Crafterole to the rescue! I remember a post Greenbean did about homemade hand scrub and I decided I could whip up a few of these for the girls teacher's quickly. Here is a link to Greenbean's step-by-step on how to make these great little gifts. While you are over there, check out all her other great projects! She is a fantastically crafty lady!

Here is my Completed Teacher gift:
Greenbean labeled this hand scrub as garden hand scrub, so decided to use my Freshly Picked Cart to decorate it. I was able to get these gifts made up rather quickly and in time for the end of the school year. Now I am catching up on my blog posts.

Here is a close up of the little Gnome. He is just so stinking cute! He was cut at 2.5" and finished up with some pen and pencil accents.
Here is the apple bin from page 49. I cut it at 1.35" and used some pens to give some more details. I found a small piece of wood patterned paper in my scrap box and used that to cut the fence layer. I stamped the Thank you using a Stampin' Up stamp and then hand cut the sign.

The flower and leaves on the top of the jar was cut from Mother's Day Bouquet. I inked them up using Distress Ink and stuck a gem in the center. The Ribbon is Martha Stewart Ribbon I picked up at Michael's.


I really like that little Gnome. I think I may have to make one for my Scraproom. :)

Have a Great and Crafty Day!

Jan

Sunday, June 12, 2011

Yudu Tshirts using Hannah Montana Cartridge

Hi All! I have been working hard on projects to share with you. I am trying to keep up with my own cartridge challenge, and I am happy to post something using one of those cartridges today.

I made a couple of t-shirts for my dd's using the YUDU and the Hannah Montana Cartridge.

I have been using outdoor vinyl on my YUDU screen instead of Emulsion. I still need to practice more, as I am not always getting as crisp of an image as I want, but overall I am pleased with how these shirts came out.

The white ink I used was Versatex. I thought the Ink was very thick, so on the first shirt I watered it down some..it bled through the shirt more and bled under the vinyl too. SO for the second shirt I used it straight from the pot, without diluting it. I got a better image, but still not perfect, and it also still bled through the fabric, although not as much.


The Sparkly Ink is YUDU Gunmetal bronze. I LOVE this color. It turned out so sparkly and it hardly bled through the fabric, so I may just stick to YUDU ink in the future.

The Heart image was cut at 10.81 inches., and the Fonts were cut at 1.28 and 1.86 inches.


Well I am happy to have used both my YUDU and a cartridge that was on my challenge list.

Have a Great and Crafty Day!

Jan

Thursday, June 9, 2011

Hello Kitty Cake

Hello All! I have been so busy visiting with family that I have not had time to post pics from Alex's Sweet 16th Birthday Party.

Well I thought I would share her birthday cake with everyone. I was quite pleased with how it turned out, seeing as I have only made like three cakes so far, and this was the first time I tried to make a layered cake.

Alex and I made 4 layers; one each at 10", 8", 6", and 4" in diameter. Each layer, except the bottom one, was cut in half and filled with a strawberry preserves filling.

Then we spread a thin coat of buttercream frosting on each layer to give a nice smooth finish to the fondant.
We colored our white fondant with hot pink, light pink, and black gel colors. Then we covered alternating layers with the light pink and hot pink fondant. The layers are supported inside the cake using wooden dowels cut to size and cardboard inserts between each layer.


This is where my Good Friend Missie, from Created by Missie came and helped me to decorate the cake.


Then we whipped out the Cricut Cake Machine and cut out Hello Kitty at 2.5" from Hello Kitty Greetings page 29 in white and black and we cut her bow in light pink. We also cut 4 sets of "16" from Hello Kitty Font cartridge. I believe they were cut at 1.5 ". We also cut a variety of circles in white using the Hello Kitty Font cartridge, page, 72 Shadow feature. We used Wilton's Pearl Dust on all white and pink fondant to give the cake some sparkle. (Thank you Leslie..for that tip!)

I also used a fondant mold to make the borders and flower buttons on the cake. It is hard to see in the picture, but the bottom border had flowers on it, the borders on the two center layers have a stitching pattern, and the top layer is a wide scalloped border.
Here is our finished cake. I am so pleased with how well it turned out. The more I make cakes, the less stressful the decorating becomes. This one was actually very fun to make.


I hope you all have a Great and Crafty Day!

Jan

Thursday, June 2, 2011

Elegant Edges Mini book Mother's day gift

Today I am sharing a mini book I made using the new Elegant Edges cartridge. I love, love, LOVE this cartridge. There are so many beautiful cuts on here. I think this is going to be one of my new Go-To cartridges. I made this book for my Mom for Mother's Day.


I cut four pages using the book-Shift key. All pages were cut at 3.5 inches. I first cut them in chipboard, and then cut paper layers for both sides of the pages. I then inked the edges with Tim Holtz Distress Ink in Tea Dye and Walnut Stain. For the cover, I then had cut the flowers and centers and layered them using pop-dots. I added a few peals to the centers of some of the flowers. I colored the pearls using Bic's Mark-It markers.
For the inside pages, I matted a photo on one page, and hand cut a small pocket for a tag on the opposite side. I have a 2-page spread for each of my three girls. Each of my daughter's then wrote a Happy Mother's Day message on a tag for Grandma. The tags were cut from Tags, Bags, Boxes, and more cut at about 3 inches.
I added gems that I had hand colored using the markers around each picture and a few gems on the pocket page as well.

It is a simple little book, but I am happy with how it turned out.

I used DCWV 8x8 Craft Stack for all the pages.
I picked up at TJMaxx for $3.99. If you have a TJMaxx or Marshall's near you, I would highly recommend checking them out. I picked up quite a few stacks there a few weeks ago. The 8x8 stacks were $3.99 and the 12x12 stacks were $5.99.

Have a Great and Crafty Day!

Jan