Welcome!
I was introduced to scrapbooking in 2005 and have been hooked ever since. My love of crafting has branched out to include DIY, projects, gardening, baking, and canning. I hope to share my projects here.
Saturday, July 30, 2011
My Smash book project - part 2
Again, most of these pages are not completed yet, and on many of them, the backsides are not done at all.
Here is a page on backyard camp outs. I printed the paper using my Imagine Hopscotch cartridge. The Camper pocket is cut from Going places, and the Top ten, numbers, and the list icon are from Graphically speaking.
Here is a page on swimming. The paper is Cosmo Crickets Snorkel. The cuts were from H20. The raft is a Jolee embellishment. I used Bazzil Bling paper on this page too. Also the little alligator was from DCWV SafariKids Stack. Here is the start of some pages about our big camp out to Kickapoo State Recreation area. Here I just used a brown lunch bag as a pocket.
Here I cut the Camp journal sign from Camping Critters for some smaller insert pages.
I printed out my journaling for the entire camp out onto 5.5 x 10" papers. It will look like a small journal stuck into the middle of my smash book.
Here is a page I am working on, showcasing the pictures we went on this camp out to get. This paper is Bo Bunny's Roughin' It.
The top picture is my dd and my bff's DS taken in 2002. The middle picture is a picture of the picture on the same trail. The bottom picture is of our kids taken this year..recreating the picture somewhat. Plus a pic of them being silly. It sure doesn't feel like 9 years since that first picture. Ah.. My Harry Potter page....Harry Potter and the Deathly Hallows, Part 2 released while we were camping. I made my DH take me to see it the evening we got back from camping. The 8x8 paper is from DCWV Once Upon a time stack, all other embellishments were from a Harry Potter paper pack and accessories kit.
Here is a very simple page, using just a sheet of craft cardstock, a sheet of white cardstock, some stickers, pens, and brads. I decided to keep track of everything I did one day, just to see how crazy the numbers would be. I am really pleased with how this one turned out, for being such a simple idea. The July 27 was cut from Cuttin' Up. Everything else was older Creative Memories stickers from my stash.
Here is a close- up of the journal tabs on the page. I printed out my items, added stickers around the journaling, and then used a few different sized square punched to punch them out.
Well that is the progress I have made on my smash book. I have used most of the cartridges from my cartridge challenge for it. I have more to add to it, and when I complete more pages, I will share them as well.
Thanks for visiting me today.
Have a Great and Crafty Day.
Jan
My Smash book project - part 1
I am still working on my smash book project. I had grand plans to post my ongoing progress, but as life goes, here we are at the end of the month and I haven't posted one progress post. lol
So..I thought I would share what I have done so far....
I wanted to do a theme of the Month of July. I was trying to give a fairly good picture of what our life is like on a day to day basis here.
I have the book taken apart, as it was easier to rearrange the pages that I have worked on so far. No page is complete yet, as I have to do some journaling on some of the pages.
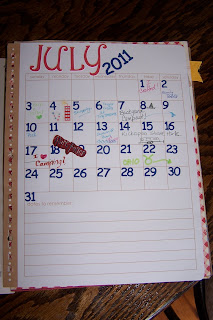
Here is a calendar page
I have been trying to use up things in my stash, so I have been using stickers where I can. I'll admit, I don't use many stickers anymore since I discovered my Cricuts, and I have a huge stash of them, so I am glad to be using some of those up. I did cut the July 2011 from Nursery Rhymes. I really like that font. I have used it quite a few times.
Here is a page on a family BBQ we had. The top note is cut from my Imagine, I flood filled the stock shape using the Best Friends Cartridge. I printed it on the reverse side of a store-bought printed paper. Instant two sided paper! I love the Imagine for this. The Grill was cut from Block Party Lite Cartridge.
Here is a 4th of July page. I used Independence Day for the title and the firecrackers. The journal tags and diecuts were from Yankee Doodles paper from We R Memory keepers.
Here is some paper from Simple Stories - 100 Days of Summer from Archivers. The felt flower is from my stash from last Valentine's Day. The paperclip I got from Staples. It looks like the ones that K&Co sell as their "Smash" clips, but I got a whole lot bigger package with many cool colors for a fraction of the price.
This is on the playgrounds we have played at this month. I am still working on most of these pages. The embellishments are Jolee's foam stickers that I have had for years.
Here is a page that is going to have some journalling about what we did when the weather was too hot or rainy to be outside. I printed the cloud papers using my Imagine and Best Friends and Hopscotch cartridges. The kid with the umbrella and the Rain title are from Nursery Rhymes.
Here is a record of the weather/temperatures for the month. I added a little Arizona die cut from K & Co. and an arrow cut from Going places. It talks about how phoenix had an actual temperature of 118 degrees. OOh that is hot.
Here is a close up of some of my journaling as well as a news paper clipping about the extreme rain Chicago was hit with. I stamped the arrow.
I will upload the rest of my progress in the next post.
Have a Great and Crafty Day!
Jan
Thursday, July 21, 2011
Ohio Circle Meet-up Magnet
I used the Pineapple drink from Life's a Beach cartridge. I then used my Gypsy and welded a Cricut Circle Logo to the top layer of the orange, and I used green paper, and some glitter paper to make it a lime. :)
I folded the pineapple on the score lines and inked them so then stood out some more. Because the cut is so small, its only about 2.5 inches tall, I used markers to color the umbrella stick. For the umbrella top, I flood filled a rectangle at the 8.5 x 11 ratio on the Imagine using the Better Together Cartridge. I, once again, took the printed piece to my E2 to cut the layer out. I am quite pleased, as those umbrella tops are SMALL and the pattern is just the right size.
I cut the straw off of the bottom layer and glued on a small wire candy cane that I had straightened out..Instant straw! I used my stash of those, so I am glad the craft stores are getting out the xmas stuff already. I will be picking up a bag or two of those again!
I also cut a small flower from Life's a Beach. I sized it down to fit onto my pineapple, and then used stickles to color in the layers, rather than trying to cut those pieces that small.
I finished off my pineapple with a bow made from Hemp, and added my magnet to the back.
Well I am off to finish packing and get ready for my Road-Trip Buddies to arrive!
Hope to see you in Ohio!
Have a Great and Crafty Day!
Jan
Calling Card for Ohio Circle Meet-up
Well Here is my Calling Card:
Most cuts were from Camping Critters, except the car which is from Locker Talk. I also used my Imagine and the Best Friends Cartridge to make the patterned paper used for the map.
For the cute deer, I used liquid applique on his belly and tail. When you heat it, it puffs up. I glues two different sized googily eyes on him to match the crazy eyes that are on the animals on this cartridge. I flood filled a large rectangle on the Imagine using a pattern from the Best Friends cartridge. I then cut the map/belly layer out on my E2, so the cut sizes would be consistent. I folded the map to give it some extra dimension.
For the sign I used the shift-cut on page 57 for the base of the sign, and the shift cut on page 56 for the top layer. I then used a small stamp set I have to stamp on Ohio and Illinois..
The Car was cut from Locker Talk. I only cut the front half of the bottom layer of the car, and the font bumper. The wheel is a random circle also cut from Locker talk. I used a regular hole punch for the hubcap. I added a little glossy accents over the headlight spot.
I did emboss the base of the card with the Seeing spots Cuttlebug folder, but you can not really see that, since I didn't take a picture of the back side of my card.
All paper used was Bazzil except the blue layer in front which is DCWV Adhesive- backed paper.
I used Tim Holtz Distress Inks on various pieces to add some definition. I just love using these inks. I am on a mission to collect them all!
I will make another post today to share the magnets I made to trade.
Then I need to get ready to leave for Ohio!
Have a Great and Crafty Day!
Jan
Monday, July 18, 2011
Cricut Circle Pennant Contest - Illinois Pennant
a. Theme:
The pennant should be your representation of the state, providence or country of your choosing.
b. Pennant Size and Shape
The pennant shape is from the BIRTHDAY BASH CARTRIDGE. The ‘pennants’ that can be used are in the font section on pages 58-70. Please use a ‘fit to page’ for a 12×12 inch piece of paper.
Here is my pennant:
I chose to do a Route 66 theme. The cityscape was cut from Plantin Schoolbook. The Sears Tower and Illinois title were cut from Destinations. The Green Landscape, Corn, and Church were all cut from Pop-up Neighborhood. I hand cut the road.
The car and Route 66 sign were cut from Nifty Fifties. I cut the girl from Forever Young. I tied a single thread around her pony tail and used some embroidery floss as her scarf.
Here is a closeup of the corn. I cut two sets of corn then trimmed them down to fit in the space. I glued the bottom stems down, but pop-dotted the tops to give them some more dimension.
I used pop-dots on most layers to give the entire pennant more dimension.
It was quite a bit of work, but I am very happy with how it turned out. I hope Provo Craft enjoys it as well.
Have a Great and Crafty Day!
Jan
Tuesday, July 5, 2011
Library Bags using Yudu
I am really loving my Yudu machine today! These totes were so easy to screen...we went from plain bag to screened and out the door in about an hour! I used outdoor grade vinyl on my screen instead of emulsion. I find it works great and costs a fraction of what emulsion costs. This particular brand is from H & H sign Supply online. It is GT5 Intermediate vinyl. I purchased it in a roll of 12" by 10 yards.
I planned my design using Graphically Speaking Cartridge and my gypsy. I placed the images centered on my mat and then cut the vinyl out. I did not reverse the image as I placed the vinyl on the TOP of my screen. I popped it in my YUDU, flooded the screen and pulled once....Voila! I quickly dried the ink on the tote bag with my heat gun and then heat set it again using my iron. We were out the door in no time.
I also made some little monogram tags for each bag so the girls can tell theirs apart. Both girls picked which mini monogram they wanted for thie bag and I cut them using QuickKutz vinyl I picked up from Hobby Lobby. I then quickly laminated each tag using my Yourstory machine, punched a hole in the corner and stuck a keychain on it. I hung the tags from the bag handles.
A quick and fun little summer project.
Thanks for visiting and have a Great and Crafty Day!
Jan
Monday, July 4, 2011
Happy 4th of July ...Patriotic Pins
I made us some pins to wear today from the Independence Day Seasonal Cartridge.
the pins were just cut from cardstock, tied with twine, and I glued a pin back to them. Easy-peasy right?!
I love the easy ones. LOL
Have a Great and Crafty Holiday!
Jan
Sunday, July 3, 2011
Monogram Hats for Passport Hat Pins
Just popping in with a quick post on some hats we made for my daughters. Michael's Crafts stores is currently running a kids craft program called the Passport to fun. Every Tuesday, Thursday, ans Saturday until July 30th, they are offering free kids projects in the store. Each day has a different country theme and there are two projects; a craft and a hat pin.
My daughter's are having a lot of fun going to Michael's and making these projects. So we bought them each a hat to wear to Michael's and to display the hat pins that they are making. Each girl choose her own monogram from the Hello Kitty Font cartridge and I reversed the images, cut them in Heat Transfer Vinyl and ironed them on the hats.
Here is a close-up of the pins they have made so far:
A moose from Canada (He was actually the regular craft, but the lady running it gave us pins to go on the back of him too!) The Bell is from Germany.
The mummy is from Egypt. (Isn't he just too cute?), the Lei is from the Bahamas.
The Maple Leaf is the Canada Pin.
There are still 14 more countries projects for my girls to complete. If you have little ones, I really recommend going to a few of these. they are free and don't take up too much time.
Have a Great and Crafty Day!
Jan
Saturday, July 2, 2011
A Smashing July!
I spent an afternoon going to different scrap stores, and picked up some fun patterned papers for my smash book. I also choose a few favorites from my stash at home, and I printed a few using my Imagine. I got some Mat board from Hobby Lobby and cut it down to 8.5 x 11. I then punched the pages and covers using my Bind-it-All. I am currently using some binder rings to hold the book together. I may want to rearrange the order of the pages, so I am not going to put on the final O-ring binding until the month is over. I also haven't decorated the cover yet, as I am waiting to see how the feel of the book develops.
I picked up a few of the smash book products, as well as other little doo-dads that I might want to use in my book and I gathered it all into a plastic case.I plan on making the month of July my theme for this book, and I am going to try to do something in it everyday this month. I will make a weekly post with my progress on this project.
Have a Great and Crafty Day!
Jan
Friday, July 1, 2011
Having Fun Layout
The patterned papers were all printed with my Imagine. I used Best Friends and Hopscotch Pattern Cartridges. I cut the Having Fun, the Bug Jar and the Little Girls with the nets all from Playtime. The nets came from a boy cut. I just trimmed the nets from that cut and used them on the girls.
I also used Birthday Cakes on the Imagine to color the circles and the scalloped border and the Bug Hunters title.
Here is a close up of the bug Jar from Playtime cartridge. I cut the jar shape from acetate. I Inked the edges with Staz-on to give it some dimension. The bug jar is supposed to have a grasshopper in it, but I trimmed him off. I then took some tiny bee stickers and colored them black and then used some stickles to give them a fireflies glow.
I am glad I got this month's projects done. I have many projects planned for the next month, so come back and visit me again.
Have a Great and Crafty Day!
Jan
July Cartride Challenge Picks
I have been plugging away at my cartridge challenge pretty, and am happy to say that I have so far, used 89 of my 137 cartridges in posts on my blog. I have 48 more carts to use in blog posts to complete my challenge. I feel pretty happy at my current progress, and I plan to keep plugging away at my challenge.
So, that being said...On to this Month's Picks:
Cricut Decals E2
Going Places
H20 - seasonal
Independence Day
Nursery Rhymes
Ornamental Iron
Printing Press
Very Merry Tags
I also plan to use my Imagine on at least one project.
It is easy to fall into the cartridge collector mode, so I encourage all my cricut friends to challenge yourself to use all your carts too!
i look forward to seeing all the great projects out there this month!
Have a Great and Crafty Day!
Jan