Welcome!


I have always enjoyed being crafty. I remember getting really excited about stickers and fun stationary when I was little. Well its good to know that some things in life never change!

I was introduced to scrapbooking in 2005 and have been hooked ever since. My love of crafting has branched out to include DIY, projects, gardening, baking, and canning. I hope to share my projects here.

Sunday, February 26, 2012

Crop Goodies- Notebook and Charm

Hi all! I am so excited, because today I am going to an All Day Crop! Its from 9 am to 9 pm, and I am looking forward to hanging out with my friends as well meeting new friends.

There are going to be some circle sisters at this crop, so I made some little goodies for them.


I found this fun pom-pom pen in hot pink, so I searched for a little notebook that was hot pink too. I found this gem at Staples. Its a pretty chunky little notebook with blank pages inside.

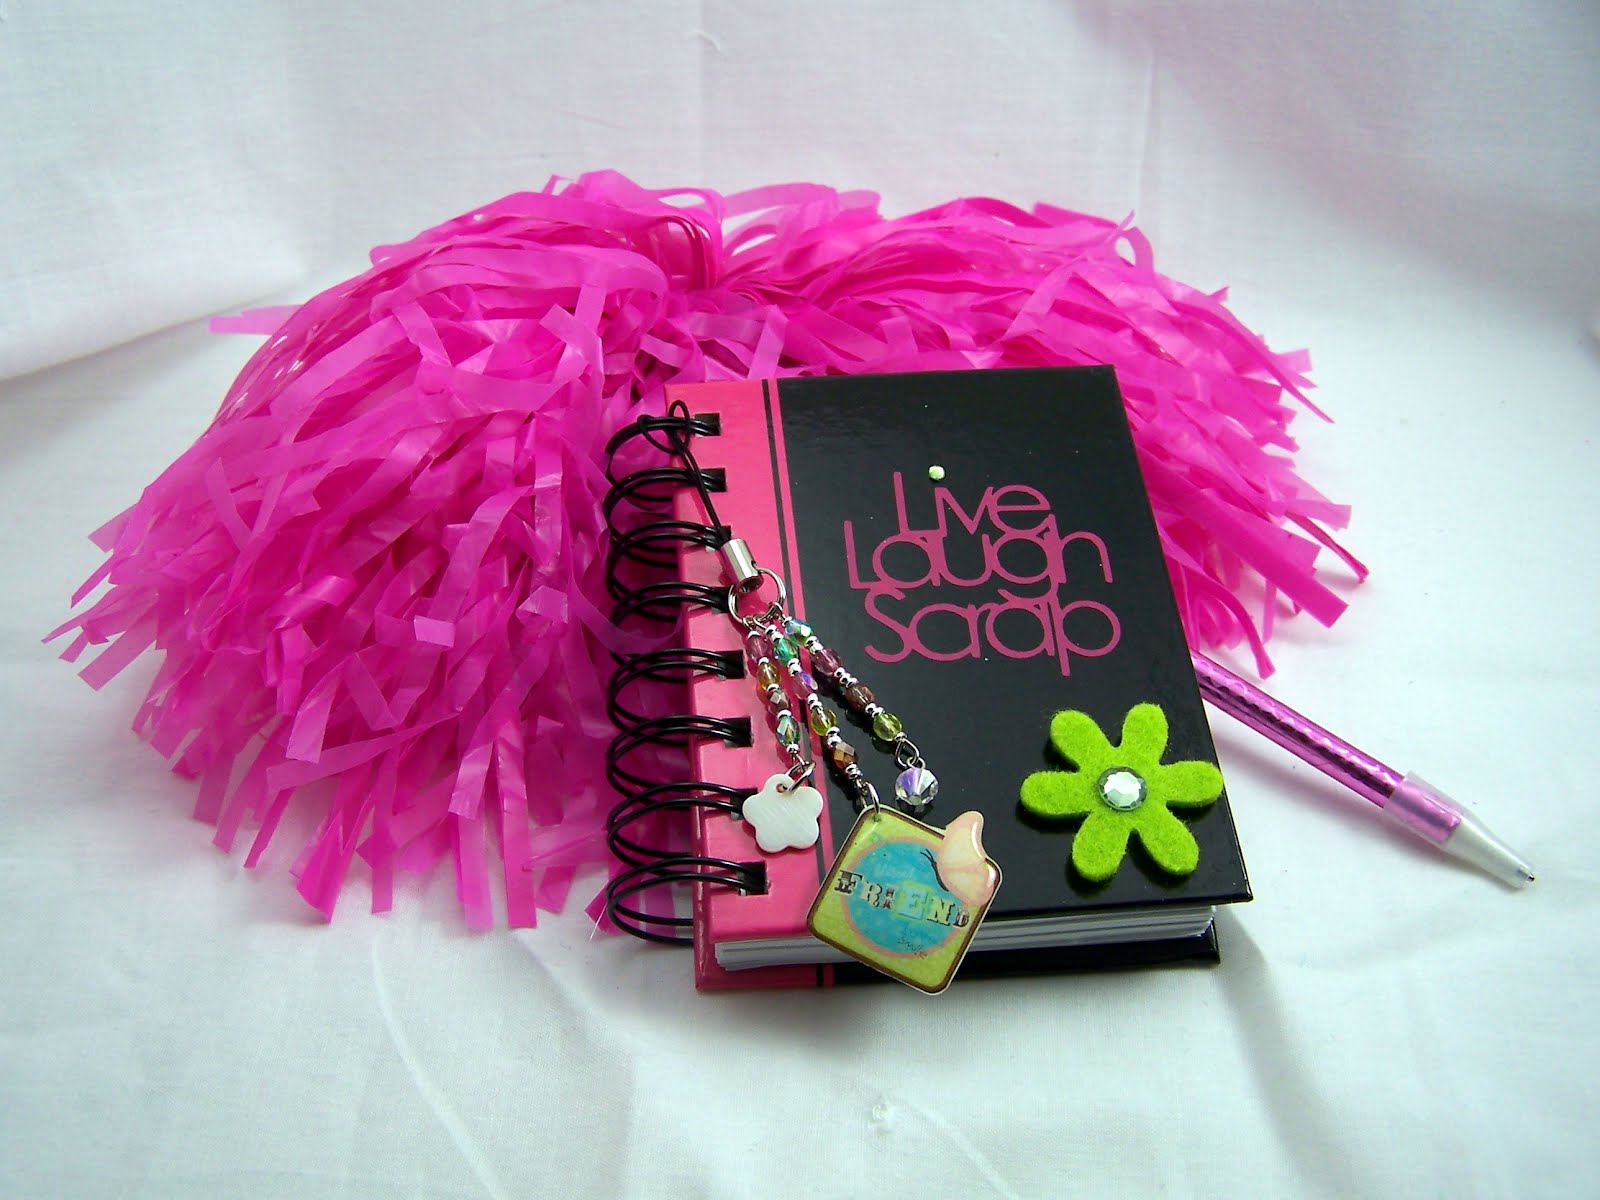
I cut the title in vinyl from Cricut Everyday Cartridge which was a Circle Exclusive. The felt flower was from my stash.

I made this charm using my Imagine and Imagine More Cards and InkJet Shrinky Dinks. I printed the image at 2.5 inches, punched a small hole in the corner and baked it in the oven. After is shrank, I covered the top with Ultra Thick Embossing Powder and stuck it back into the oven to melt. I got this tip from Nadia over at With Glittering Eyes. It gives an awesome smooth and shiny finish to the charm. I then made a few bead strand with beads from my stash and attached it to a Cell phone charm holder.
I cut the Cricut Circle Logo from Cricut Everyday as well. Its hard to see in the picture, but I used lime green glitter paper.
I haven't had much time to craft this month, but I am hoping to get some things done at the crop, besides just chatting ;). Maybe I'll have some things to post later this week.

Thanks for visiting today.

Have a Great and Crafty Day!

Jan

Friday, February 24, 2012

Machine Covers and a Crop Night out!

Hi all! Sorry to be MIA for a while. February is such a busy month with Valentine's Day, two of my daughter's Birthdays and my Anniversary. It seems like every year February gets crazier and crazier.

So I am late in getting this post up. I went to an overnight crop at a friends house and we made covers for our machines. My good friend Jan over at Craft Place brought the pattern and showed me how to make these reversible covers. I am so glad to have friends that I can learn new things from. Jan helped me make these and taught me a few sewing techniques, as I am a complete novice at sewing.

So here are my Imagine and my E2 covered. My covers are all black swirls on one side/hot pink flowers on the other.
Here is the other projects I did at the crop after making three covers:

I made 22 ice cream cone valentines and 23 Peace sign valentines, and 4 of the larger Valentines cards for the teachers. The Ice Cream cone and Peace Sign were both from SVG Cuts - 24 Valentines set. the teachers valentines use a heart shaped doily I picked up at target, and two different sized hearts cut from Art Philosophy and stamped with the coordinating stamps from the Mad About You CTMH stamp set.
Here is a pic of my Expression cover:
Here are my Friends and I sitting in Tina's AWESOME crafting space in her basement. We had a great time. I look forward to the next time we can do this.
(LtoR: Me, Jan A, Tina L. and Missie T.)

Here are all my covers together set up at Tina's house, along with some of the projects we made.
I have an all day crop this Sunday and I am looking forward to hanging out with my friends and meeting some new crafty friends. As well as getting some projects done.

Thanks for visiting today.

Have a Great and Crafty Day!

Jan


Sunday, February 12, 2012

Spring Layout

Hi all,

Today I am sharing a layout I made for a friend.

Most of the papers used were from a Finished in a Flash Kit from Paper Wishes that I have had in my stash for a while now. The only cartridge I used was Botanicals for the butterfly/floral cuts as well as the font.


Here is a close up of my butterflies:

I cut the images twice, once in patterned paper and once in vellum. I then hand cut out the butterflies so I could add some dimension to the them. I placed gems along the centers of all the butterfly cuts.

Here is a close-up of the Spring Title:

I used a Stampin'Up Sizzix Embosslits to make those tiny butterflies by the title. I then attached them to the paper using my Tim Holtz Tiny Attacher for the bodies. I used a Fiskars Border punch for the edge.


I added a few gem swirls from Want 2 Scrap that I picked up at a Scrapbook Expo.

Recipe:

Butterfly 1 and its Shift @ 6.5 in.
Butterfly3 and its shift @ 4.0 in
Font and shift @ .92 in.
Fiskars Border Punch
Stampin' Up Sizzix Embosslits Beautiful Wings
Papers; Hot off the Press Finished in a Flash Kit. Paper Studio Vellum
Gems
Tim Holtz Tiny Staples

Thanks for visiting today.

Have a Great and Crafty Day!

Jan

Friday, February 10, 2012

Friend Tag

Hi all,

Today I am sharing the next tag for my 52 Tags in 2012 Challenge over at Pause, Dream , Enjoy. You can learn all about it here.


The Challenge for this tag was to make a tag in your BFF's Style. I chose my two closest crafty friends for my inspiration

Missie, from Created by Missie who LOVES to use glitter.
Jan from Craft Place who makes the most FABULOUS flowers.

I love hanging out with these ladies. We have the best time, and I am always learning new things from them.

So here is my tag:
I precut all my base pieces, and then I just cut all the layers each week for the challenge. I Saved a file on my gypsy with all the base, layers and frames all sized accordingly, so I can just open up that file and pick this weeks paper to cut.

This week I am using papers from a DCWV Dazzle stack I found on the clearance rack at JoAnn's earlier in the week. It was quite the score! I am telling you, this paper cuts like BUTTER on the Cricut! I am definitely getting more of this paper. It is so sparkly and it does NOT leave glitter all over the place like other glitter papers. I do not like have having glitter all over my mat, or worse, inside my machine. I cut this with a blase depth of 4, single cut, with an older blade. The white Bazzil used for the base I ALWAYS have to cut twice to get a nice clean edge.

I would recommend you getting a piece and trying it out!

Here is my recipe for today's project:
Tag - Elegant Edges - Page 38 Oblong Shadow @ 5 in.
Flower - Flower shoppe - Page 16 -Fun 3 6X z@3In. , Fun4 @3 in, Fun 2 @ 3in and 2.5 in.
Bookplate - Fabulous Finds - Pg.82 @1.5in.
Stamp & Ink - Stampin' Up.
Gem and Brads from my stash
Papers: DCWV Dazzle in Green patterned and Pink solid, and Bazzil Bling in White. Green scrap from my stash.

Thanks for visiting today.

Have a Great and Crafty Day!

Jan


Wednesday, February 8, 2012

Live Laugh Love Valentine

Hi all,

Here is a Valentine I made for my Hubby. It is my entry into this weeks Cricut Circle Weekly Blog Challenge. The challenge is to make a valentine with two Cricut cuts and sequins or gems and ribbon.


I used the Love is in the Air Word Art embossing folder. I used a some scraps of chipboard to make a base so that the hearts on the side of the embossing folder did not emboss. I then embossed a piece of white Bazzil Bling paper . I punched out many little hearts and placed them over the little hearts on the embossed image. I added some tiny gems around the embossed swirls.
The bow is a piece of burgundy ribbon as well as a bow from white glittery tulle.

I cut the lips and hearts from the Love Struck Cartridge in a shimmery burgundy cardstock, and adhered them to the card front with pop dots over the space that where the hearts would have embossed.

I then matted the embossed image on red Bazzil Bling paper and then onto a black card base.

I never really know the best way to showcase these types of embossing images in my projects. Its easier to use the repeating pattern embossing folders. I never mind layering things on top of them, but with these larger images without a repeat pattern, I often find myself struggling with what section to cover up with the top layer of the design.

Thanks for coming... I hope you enjoyed your visit today.

Have a Great and Crafty Day!

Jan


Tuesday, February 7, 2012

Bookmark and Book Gift Box

Hi all!

Today I am sharing my entry into the Cricut Circle Blog Monthly Challenge.
The challenge is to make a gift for someone.

I made this Gift Box to look like a book to hold the bookmark I made.
For the box, I used Tags, Bags, Boxes and More Match2 blackout cut on pg. 65. I then sized some rectangles from George to fit slightly larger than the box base for the covers. I cut them out of chipboard, and covered them with a patterned paper from my stash. I scored a piece of Black Magic Cardstock for the spine. I cut the word Read from a font on Calligraphy Collection that I welded together with my Gypsy.


I scored the edges of the box to look like pages in a book.

I lined the box with a page cut form an old book. I inked up the edges with Distress Ink. I hand cut the tab that holds the magnetic closure on the inside of the box.

Here is a close -up of the bookmark I made.

I am a complete novice when it comes to beading, but I really wanted to make this bookmark using the book cut from Graphically Speaking.

I cut the base cut at 1.5 inches using Shrinky Dinks. I then hand colored the details on the plastic. I shrunk it with my heat gun. It may be hard to see, but the book isn't flat. While it was warm I bent it to a shape more like an open book.

I then covered the white areas with a fine white glitter and some diamond glaze.
I am making these for my daughter's teachers and aides. I am really excited for how they turned out. I will probably make them all a little different, as many of those beads are older ones from my stash and I need to make 8 of these.


Thanks for visiting today.

Have a Great and Crafty Day!

Jan

Saturday, February 4, 2012

Mini Cards

Hi all!

I was digging in my envelope drawer and I found this small stack of mini envelopes so I decided to make some cards to go with them. The finished size of the cards is 3 x 2.5.

They went together really quickly. I made 4 birthday cards and three without sentiment, so they can be personalized later.
Here is a close-up of a few of the cards:

The Stamp is from Stampin' Up, and I have the coordinating punch for it. I just colored the flames and candles with a glitter pen. I added a twine bow and used a Fiskars border punch on the edge of the Hot Pink. I made this card also in a blue background/pink stamp color.

Here is the other Birthday one:
the Stamp is Stampin' Up. I hand cut it out. I used the same Fiskars border punch. This one I also made in the opposite color scheme.

Here is a one I used some buttons from my stash. I This one I added some embossing to the top white layer. I also made this one in a green base with yellow and purple buttons.
And the last one:

This has a flower shaped ribbon slide that was in my stash. I also embossed the top white layer on this one too.
These cards went together so fast. I spent maybe an hour on all seven. I really like this smaller size to add with gifts and such, so I may make some more of these soon.

Thanks for visiting today.

Have a Great and Crafty Day!

Jan

Friday, February 3, 2012

Birthday Cake Cards

Hi all,

Today I am sharing the cards I made for my daughter's birthdays this month. They are only a year apart, and they like everything to be the same, so I always make the same cards for them.
I cut the shaped card form Birthday Bash at 5.8 inches. I then used my gypsy to hide contours on the layered pieces so I could cut them in different colors. I used Divine Swirls and Swiss Dots cuttle bug folders on a few of the pieces. I also added some blue glitter to the "sprinkles" as well as glitter and flock to the flame parts.
The ovals are punches from Stampin' Up. The number stamps are I believe from Hero Arts. I added some twine and glittery gems to the oval.

Thanks for visiting today!

Have a Great and Crafty Day!

Jan

Thursday, February 2, 2012

February Placemats

Hi all,

I am making my daughter's placemats for every month this year. You can see the previous ones here.

Here are the February ones:

Maddie and Ellie each choose their own patterned paper from my stash.


I then cut their names using the Rock Princess Heart font and shadow. The names looked a little lost on the patterned paper, so I added a strip of white glitter paper under the names. I accented the names and corners of the white paper with some glittery heart stickers I bought a few years ago.
Here is Ellie's mat:

They are quite plain, as the Your Story Laminator works best on thinner and fewer layered items.

I also have decided that vinyl works best for the letters/layers as it is so much thinner. I need to up my vinyl stash so that future placemats can have more layers.

Thanks for visiting today

Have a Great ans Crafty Day!
Jan