Welcome!


I have always enjoyed being crafty. I remember getting really excited about stickers and fun stationary when I was little. Well its good to know that some things in life never change!

I was introduced to scrapbooking in 2005 and have been hooked ever since. My love of crafting has branched out to include DIY, projects, gardening, baking, and canning. I hope to share my projects here.

Showing posts with label Cards. Show all posts

Wednesday, February 8, 2012

Live Laugh Love Valentine

Hi all,

Here is a Valentine I made for my Hubby. It is my entry into this weeks Cricut Circle Weekly Blog Challenge. The challenge is to make a valentine with two Cricut cuts and sequins or gems and ribbon.


I used the Love is in the Air Word Art embossing folder. I used a some scraps of chipboard to make a base so that the hearts on the side of the embossing folder did not emboss. I then embossed a piece of white Bazzil Bling paper . I punched out many little hearts and placed them over the little hearts on the embossed image. I added some tiny gems around the embossed swirls.
The bow is a piece of burgundy ribbon as well as a bow from white glittery tulle.

I cut the lips and hearts from the Love Struck Cartridge in a shimmery burgundy cardstock, and adhered them to the card front with pop dots over the space that where the hearts would have embossed.

I then matted the embossed image on red Bazzil Bling paper and then onto a black card base.

I never really know the best way to showcase these types of embossing images in my projects. Its easier to use the repeating pattern embossing folders. I never mind layering things on top of them, but with these larger images without a repeat pattern, I often find myself struggling with what section to cover up with the top layer of the design.

Thanks for coming... I hope you enjoyed your visit today.

Have a Great and Crafty Day!

Jan


Saturday, January 14, 2012

Happy Birthday using Just a Note

Hi all!

Today I am sharing a card I made for my Cousin's daughter. It is the first time using the Just a Note cartridge that came built into my Expression 2 Anniversary Edition.

I have to say, after struggling to make this card.. the Just a Note cartridge is not one of my favorites. At least not the tri-fold card and its layers. Since I can not cut with the cartridge using my Gypsy, I felt more limited.

Here is the entire card:
I used a piece of Whitewash collection paper for the base. The patterned paper was from an older 8x8 stack by the Paper Studio called So-So Sweet. I added bling and twine to the front. I am not loving the font used with this cart.

Here is the second layer:
I cut the base of the cake twice, once in patterned paper and once in white Bazzil Bling. I trimmed off the stand from the blue layer so my plate and cake were different. I added some glitter, bling, and twine to this layer.

Here is the inside opened up:As you can see, I embossed each section with a different embossing folder. Although the cupcake one on the front layer was too busy for the Happy Birthday to sit on, so I covered the front layer up with the same blue patterned paper as I used on the cake.

I added a rectangle with two corners punched for the sentiment. I tied some more twine around that too.

Well at least I can say that I have finally used this cartridge, although I don't think it will get very much use in the future, that is, until Provo Craft figures out how to add it to my Gypsy Library.

Thanks for visiting today

Have a Great and Crafty Day!

Jan

Monday, December 5, 2011

Mom's 70th Birthday Cards

Hello! I have been away from my blog for too long. I have recently been diagnosed with arthritis, although the doctors are still trying to determine whether it is a rheumatoid or osteo variety. I have been struggling with my arthritis and crafting. Some days are better than others, but I am getting better at living with the changes that are occurring.

I am going to really strive to craft a little everyday. My plan is to also pick up my blog posting again. Although, I have made a few items recently, Most are gifts and I do not want to spoil any surprises for the recipients, so I will not be posting them until after the gifts have been given.

Anyway... We recently celebrated my Mom's 70th Birthday. My siblings and our families met near St. Louis for Thanksgiving weekend. We all haven't been together since my Dad passed away so it was great to have everyone there.

We all went in together and bought my Mom a new laptop and I was charged with making the card for everyone to sign.

Here it is: I used a design from a Close to my Heart design book, although I made the card larger to have enough room for all of us to sign.


The patterned papers were from the Lost and Found line. I just love these glittery pages. The green leaf embossed paper is older Creative Memories paper from my stash.

The medallion is Tim Holtz. (I absolutely LOVE Tim Holtz Products!) This was also my first time sewing on a card. I practiced quite a bit before I actually sewed on my specialty paper. I also just sewed around the pieces separately and then adhered them to the card.

This stamp is from Stampin' Up. I used Versamark Ink and Zing embossing powder on it.
The inside of the card just had a small sentiment stamp that said "Happiness always" on it.

Maddie and Ellie, my two younger girls, also made cards for Granny. Maddie used Once Upon a Princess and my Baby Bug to decorate her card. She did all the cutting and pasting herself. Ellie opted for just using stamps. LOTS of stamps. LOL
Here is the inside of Ellies. I just love that she took a scrap of glittery paper and taped it to the bottom of the inside. She spends a lot of time watching me craft, and I am glad she is picking up on things.
Maddie's inside was full of snowflake stamps, as my Mom's birthday is actually in late December.
I love to see the creations that my daughters come up with. They just make my day!

Thanks for visiting today.

Have a Great and Crafty Day!

Jan

Tuesday, October 4, 2011

How old would you be...card

Hi All! Wow! Posts two days in a row! I am on a roll!!! LOL

Today I am sharing a card I made for my Father In Law.

The radio image is from DCWV Tattered Time Stack. This stack has so many neat pages on it. I used Recollections cardstock for the card base. It was plain grey ans looked too clean for the distressed artwork so I sprayed Glimmer Mist in Candy Apple Red and Graphite on both sides of the card base. I then used Tim Holtz Distress Ink in Black Soot and Fired Brick to give it a more aged look. It is kindo of hard to see the red tints to the base card in this photo. I gotta learn how to take better photos of my projects!

I cut the tag from CTMH Art Philosophy cartridge. The tag and layer are on pg 45. They were cut at 1.25 in. The sentiment I have had for a while now, and I am not sure who its by. I think I bought it at Michaels. Its part of a clear stamp set. I attached it to some red twill tape, and secured the tape using my Tiny Attacher.

I don't usually decorate the insides of my cards, but I am trying to remember to do that more now. Here I just heat embossed a sentiment from Stampin' UP using Zing embossing powder. I added a twill tape and brad accent to the cardstock as well.

It is a pretty simple card, but I think it works. I am sure my FIL will appreciate it.

Thanks for Visiting today.

Have a Great and Crafty Day!

Monday, October 3, 2011

Quick and Easy Cards

Hi All! I can't believe I finally have a crafty post! It has been TOO long. I have been feeling a little like my MOJO had abandoned me, so I spent quite a bit of time just perusing the Internet, you-tube and various blogs and Magazines to get some inspiration and help get my creativity flowing again.

I saw this fabulous idea to use the 12x12 pages that have the ATC sized cards printed on them, as the fronts for greeting cards. I always loved buying these types of 12x12 cardstock, to use for accents on my scrapbook pages. I felt they were really "smashbook-ish" (Is that a word?? LOL) Now I have another great use for them as well.

Here is a picture of the papers I chose to use. It is Fancy Pants Paper. The line is The Daily Grind. I used the DG cards page and the DG Strips page. I found these great papers at the Scrapbook Expo this year.

I also used premade cards from JoAnn's that I have had in my stash forever. It felt good to not only be crafting again, but to be using up some stuff that was just sitting there.

So for the few cards that I made, I just did a basic design, with very little extra on it and no sentiment. I figured I would just put these in my stash, and when I needed a card, I would then add the sentiment and any extra more specific embellishments based on whether I needed a birthday, anniversary, get well, or just a hello card.

Here are the cards I made:
This one was made using two pieces from the strips paper. I just added a light green rick-rack bow to it.

This one I just double mounted the card on a blue and then a cream colored cardstock and added some gem flowers to it.
This one I used a new embossing folder on the dark blue cardstock. It is called Scalloped Dots by the Paper Studio from Hobby Lobby. I then added a few brads in coordinating colors to the centers of some of the scalloped dots and offset my DG Card front.


This is my least favorite of the cards. I embossed the card base using CuttleBug's Script Texture and I lightly sanded it. Then I used a piece from the strip paper and a white bow. Its kind of plain still, but eventually it will get more embellishments.
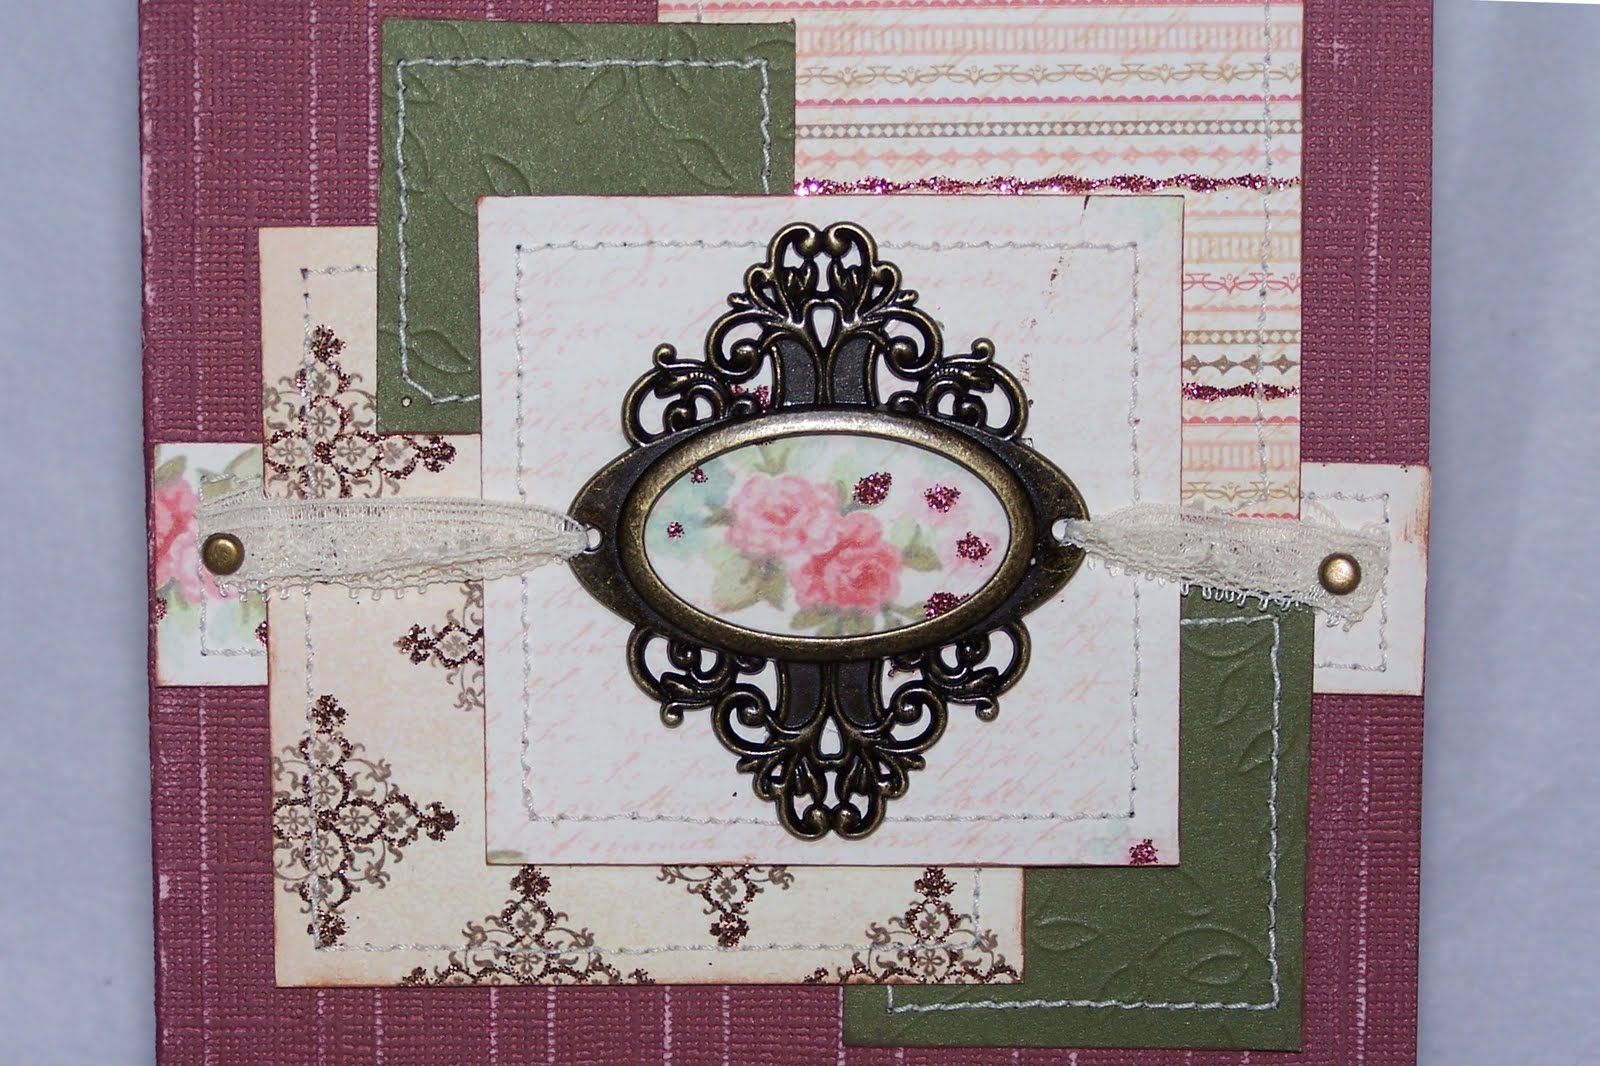
This one is my favorite one. It is the one I spent the most time on. I stamped swirls on the card base using versamark and heat embossed it with some holographic embossing powder. I mounted the DG card on some cement colored cardstock that I had punched using a border punch. I then cut some flower layers from the Flower Shoppe cart. I cut the Mum2 and Mum 4 in both 1.75 and 2.0 inches in vellum. I stamped some layers using brilliance ink, and I embossed some using Cuttlebug's Swiss Dot folder. I added some bling to the card front.

I really like this DG Card so this card is rather simple. The red plaid paper is from Imagine Best Friends Cartridge. It was a leftover from a previous project. :) I added a small blue bow that matches the blue stripe in the heart. It is so simple, but I just love it!

Here is my last card: I really liked this DG Card too. I just tied a sheer white bow to the card, and mounted it on a piece of vellum that I had embossed using Cuttlebug Stylized Flower folder. I attached the vellum layer to the card base using some silver brads.

All of these cards are really simple, but I am happy with how they turned out, and how quickly I put them together. I have more types of these ATC pages, so I am going to look through them and see about making more cards in the future.

Thanks for visiting today.

Have a Great and Crafty Day!

Jan

Thursday, September 15, 2011

Happy Birthday Matey Card

Yo Ho All!

Today I am sharing a card I made for my DH's birthday.

I would say this was a simple card, and the design surely is simple, but it sure did take me a while to get all the things sized the way I wanted. LOL..


First I printed and cut the Barmaid holding the ale from page 6. Then I went back and decided to print out the Happy Birthday Matey too. While I was printing that I noticed that the Happy Birthday background wasn't printing in black. Grrrr... Then I noticed that the barmaid's stocking's weren't black either. Well I changed the ink cartridge and reprinted the title but left the barmaid with the grayish fishnets instead of reprinting her again too.

I Printed patterned paper in a 5.5" square and then hand cut it out and curled the edges and inked the backside to add to its aged look.

I accented the Barmaid and the Title with some Sakura GellyRoll Star Glitter Pens.

For the inside of the card, I added the Wanna and question mark from Cricut Classic Font. I flood filled the letters on my Imagine to match the coloring on the Timbers.

Funny how adding one word to a title can change the entire tone of it. It makes me giggle and I am sure my DH will laugh too.

I added the sword because I had printed it for the front for the parrot to sit on and then decided not to use it there, so I just used it on the inside. The sword was also accented using the Star GellyRoll pens.


Here is a close up of the Mug of Ale. The only extra layer I cut for the card front was the foam on the mug. I added some liquid Applique and heated it so it would poof up. (I love this stuff!)
I also hand cut a small piece of acetate to layer over the mug to give the appearance of glass. It is only attached under the foam so it wiggles more than I would like, but I can live with that. LOL


I am happy to be getting back into crafting..it feels like so long since I made anything!

Thanks for visiting today.

Have a Great and Crafty Day!

Jan

Wednesday, September 14, 2011

Hooray I Crafted! Cricut Circle Blog Weekly Challenge.

Hi All! I am so super excited to have finally crafted again. It has been quite a while since I have felt good enough to make anything, and I am so happy to be feeling better.

I haven't entered a challenge on the Cricut Circle Blog is a while. I am glad they offer these challenges, as it has helped me to get motivated again.

Here is the challenge:

Weekly Challenge #40: Glittery Card Sketch Challenge!

The Challenge: This week we want to see your interpretation of the following card sketch. Please include some kind of glitter or bling on your card.

Rules and Guidelines: Circle Blog Challenges are open to Cricut Circle Members only. Your project must be newly created for this challenge and include at least 2 Cricut Image Cuts. You must submit a project to be entered into the Challenge Prize Drawing. One entry per person, please.


Here is my Entry:


I used my new Close to my Heart: Art Philosophy Cartridge to make the two cuts needed for the challenge. I used the star on page 65 and the banner on page 68.

I also used the coordinating star stamp that came in the bundle. (What a FANTASTIC idea CTMH!)

The Cardstock is all Recollections brand from Michaels. The striped patterned paper is Basic Grey Gypsy.

I used a brand new embossing folder, called Tiny Stars from the Paper Studio, a Hobby Lobby Brand.

I cut the star three times in different colored cardstock. I then stamped tone on tone for the red and orange stars and the green star I used versamark Ink and glitter embossing powder. I added some tiny bling to the centers of the stars. I adhered the bottom star flush on the paper and then used one layer of foam tape for the orange star and two layers of foam tape for the green star.

I used Zing white embossing powder for the Best Wishes greeting on the banner cut. I then tied some red/white twine on the end. and added some pen stitching.

I had distressed all the edges on the card using my Stampin' Up distressing tool.

Here is the inside:


I just LOVE this cartridge and all the awesome coordinating stamps and things that Close to my Heart has. When I look through the catalog, I just want it all! If you are interested in some close to my heart products, my friend Missie is a consultant. Here is a link to her blog where she has some great CTMH deals going on.

Thanks for visiting!

Have a Great and Crafty Day!

Jan

Wednesday, August 3, 2011

Hat shaped Graduation Card

Hi all,
Today I am sharing a card I made for my daughter's friends Graduation Party.

I used Wild Card for the card shape and the class of 2011. I forgot to write down the sizes I cut everything at. I think I used fit to page for the card, and the title I sized using my Gypsy to fit on the front.

It may be hard to see, but I cut the card twice so I could make the top of the hat two layers. I then made a tassel using some skinny ribbon I had in my stash, and attached it to the top of the hat using a brad.

The inside of the card has a yellow tag made using two Stampin' Up punches and a SU Happy Graduation stamp.


I haven't made many of these shaped cards. I did not cut the corresponding envelope for this card, but used a store bought 6.5" square envelope. Maybe next card I cut from here, I'll cut the matching card with it. I have been told that you need to cut the envelope first, then size the card accordingly. maybe I'll add that to my list of things to try for the month of August.

Thanks for visiting today.

Have a Great and Crafty Day!

Jan

Tuesday, August 2, 2011

75th Anniversary Card

Hi all,

On July 31st, my husband's Great Aunt and Uncle celebrated their 75th wedding anniversary. My Mother-in Law, asked me to make them a card, because you can't find anniversary cards that go up that high in the stores. The big party was in Florida, so unfortunately we could not make it.

Here is the card I made. The pictures aren't the best, all the fabrics and papers on the card are so light that my camera had a hard time focusing.


I picked up these fabulous fabric-like paper at Hobby Lobby with a silver sparkly floral design on it.

I cut a frame from Elegant Edges in a piece of silver linen paper. I cut the 75th from Cake Basics, and Happy Anniversary was cut from Beyond Birthdays. Both were cut from Bazzil Bling paper

Here is a close up of the birds on the front:

They were cut from Tie the Knot,using DCWV shimmer paper. I cut the branch three times and the birds twice. I then layered them using pop-dots.

I finished the card off with some White Satin ribbon and Green shimmery ribbon that matched the branch.

Congratulations to Great Uncle Allen and Great Aunt Gladys! I hope you enjoyed your very special day! May we all be as blessed as you two!

Thanks for visiting today.

Have a Great and Crafty Day.

Jan

Wednesday, April 13, 2011

Teen Boy Birthday Card

Hi All, I am sharing a card I made for my nephew's birthday.
Making a card for a teen aged boy was a little bit of a challenge for me, but I am happy with how it turned out.
I used Summer Vacation for the Jeep cut. This is a Seasonal cartridge so there are no extra features on it, so in order to make the "shadow" layer I used my Gypsy to hide all the interior cuts on the jeep and then sized it slightly larger than the main cut. It is not a perfect shadow but I think it works just fine.

All other cuts were made using the Birthday Cakes cartridge. I really liked how this gears greeting matched the wheels on the jeep. I pop-dotted the greeting on the front of the card to give some depth. The patterned paper was from Beach Fun by American Traditional Designs. The solid cardstock was from my stash of older Creative Memories Paper.


Not a super fancy card, but I am glad with how it turned out. And the best part was how much my Nephew liked it.

Thanks for visiting today.

Have a Great and Crafty Day!

Jan

Monday, February 14, 2011

Quickie Mini Valentine's Day Cards

Happy Valentine's Day to all! I hope everyone has a wonderful day.

Valentine's Day is pretty low key at our house, as we have two birthdays and our anniversary in February also.

Here are some quickie Mini cards I made to attach to the girls goodies for today.
The cardtock and ribbon pieces were from my stash of scraps. The felt hearts and bling alphas were both purchased last year during the after the holiday sales. The sentiment stamp is from Stampin' Up.

The love paper was from the Target $1.00 bin. I love checking the Target Bins for cute scrapping finds.

I love how the felt heart adds dimension to the front of the card.

Have a Great Day.

Jan

Sunday, January 23, 2011

10 Things... Gate fold card

Here is one of my projects for week three of my Cartidge Challenge.

I needed to use Graphically Speaking on a project and I chose to make a Valentine's Day Card for my DH.
I absolutely LOVE this cartridge. It is my go-to cartridge when I am not sure what I want to do on a project. Sometimes just looking through the handbook gets my creative juices flowing, even if I don't end up using this cartridge on the project. I am not sure exactly what it is about this cartridge that speaks to me, but it is one of my favorites.


This is my first time making a gate fold card. I chose to make the card 6 x 6 to keep the measurments easy. I used brown cardstock for the base. All the patterned paper as well as two stickers on the inside of the card were from an older Creative Memories paper kit called Cherish. The Graphically Speaking cuts were: Top Ten, The List, as well as the numbers on the inside. "Things" and "about" as well as the I and the U were cut from Cricut Classic Font. For the I and U I cut several layers and glued them together to make a faux chipboard monogram. I then inked the edges. The heart and its layer were cut from Doodlecharms, with the top layer embossed with swiss dots.


The prima flowers on the outside and inside of the card were sprayed with Glimmer Mist in Coffee Shop, Black Chery, Pearl, and tattered Rose.


The bling I used, both the mini flowers and round gems were colored using Sharpie Markers. I LOVE this technique. All I buy now are clear gems and color them myself.

Have a great day!

Monday, December 6, 2010

Another Jolly Holidays Card


I just love this cartridge! The cuts are so cute, but some of them have some pretty small parts.

The snowman is cut at 3.24", and let me tell you those stick arms are TINY at that size. I dropped one on the floor and could not find it, so I had to recut them! LOL

The tree paper is by My Minds Eye, Wonderful Winter stack. The green, brown, and pink cardstock is by the Paper Studio. The white cardstock of the snowman is from DCVW's adhesive backed 12 x 24 stack. The red cardstock is Poppy Parade by Stampin' Up. The sentiment stamp and tag punch are also Stampin' Up. The ribbon is from Michaels.

I used the Cuttlebug Swiss Dots and Sizzix Diamonds embossing folders on the hat. Cotton Candy Stickles and gems completed the snowman.

Sunday, December 5, 2010

Jolly Holidays Christmas Card


Here is a Card I made using the Jolly Holidays Lite Cartridge I picked up at Walmart on Black Friday. I went to Walmart at Midnight to get this cartridge and I am really glad I did. It has so many cute images on it.

I just love this little house cut with Santa diving into the chiminey!

The House was cut at slightly over three inches. I used Pearl Glimmer Mist on the white paper before I cut it out so all the white has a slight shimmer to it. After I cut the images I used some Frosted Lace Stickles on the edges of the roof and window snow for some extra sparkle. I used a glittery gemstone for the doorknob.

I used bazzil solid cardstocks and American Crafts Christmas pack for the Polka Dot paper.

I used a Fiskar's punch for the white trim on the bottom. The polka dot paper is cut at 3", and then I embossed a 3/4" strip of the red with the Divine Swirls cuttlebug folder and layered it right on the edge of the polka dot paper.

The sentiment stamp is one I picked up from Archiver's. It is inked with Color Box ink in Robin's Egg and a Crimson Lake LePlume marker for the word joys.

I made 15 of these cards to send to family and friends. Tomorrow I will post another card I made using this cartridge.

Imagine Snow Angel Card


Here is a Christmas card I made using my Imagine Snow Angel Art Cartridge.

Card Base is smooth carstock from Archivers.

I printed and cut the layer images on page 2 of the Snow Angel Cartridge. I inked the edges of the base layer and used some thinner dimentionals between the layers and to attach it to the card front.

I also flood filled the top note shape that comes stock in the imagine library with a pattern on page 43 of the Snow Angel Cartridge.

I used Brown Zing embossing powder on the sentiment, and finished the card off with some brown ribbon.

Friday, October 22, 2010

Clear Halloween Card


Here is a card I made for a weekly challenge on the Cricut Circle Blog. This weeks theme was use something clear, so I made the entire card base with Acetate.

The Gate, Tombstones, Moon, and Beware were all cut from October 31st Seasonal Cartridge. The Grass was cut from the Easter Seasonal Cartridge. The happy halloween stamp is from Stampin' Up. I also added a few star shaped gems.

Sunday, September 12, 2010

Fall Step card


Here is my first attempt at a step card. This is for a weekend challenge on the Circle board. I used ZooBalloo for the tree, Doodlecharms for the basket, the rake was made using Handman's shovel and Going Places fork. The swirl was cut using Calligraphy. The grass was cut from the Easter seasonal cart. I welded two together using my gypsy.